
Here are some screenshots from the show.
 |
| Claire Randall, pre-time travel |


So the basic components are the white dress, thin brown leather belt, brown monk-strap shoes, and a gray windowpane shawl with fringe.
I shopped around for the pattern first. I found several good candidates, though none of them had the perfect combination of the A-line bottom, 3/4 length sleeves, and keyhole neckline. I settled on this pattern for knits, mostly because I was a poor naive fool who didn't realize that sewing with knits was its own circle of hell.
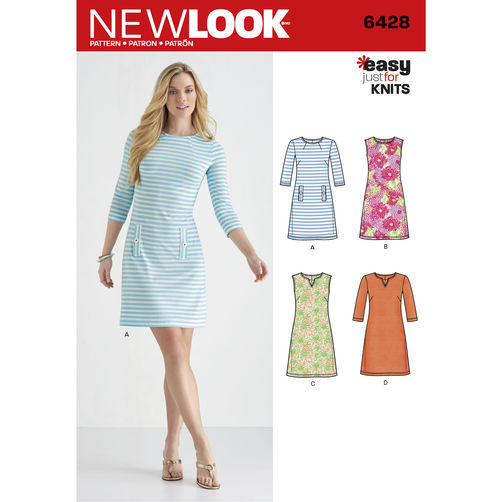 |
| Pattern Simplicity 6428 |
View "D" had the sleeve length I wanted and what could pass for the keyhole neckline if I added a button. I decided I could just add a few inches to the length to make it look more like the dress in the show. And because the dress didn't have to be form-fitting, I figured this shapeless design would be fine.
Next, fabric shopping. OK, I lied. I already had the fabric. Of course. Because when I went binge shopping at Hancock Fabrics I picked out fabrics for projects I hadn't even remotely conceptualized yet, much less planned out. So I had some white scuba fabric (which is a double-stretch knit, apparently - hence why I had to pick a knit pattern) I could use already. I believe the dress from the show is actually more of a thin crepe or something vaguely see-through, but I'm striving more for the overall look of the costume rather than exact authenticity.
For the shawl, I couldn't find anything in store, so thought I'd order some grey plaid or windowpane flannel or wool online. I found a very close looking flannel on Jo-Ann's online, but unfortunately when it arrived I found out it was just STAMPED with the pattern on the front, and the back was white! Hmm. I think I can still make it work by sewing it together so it just feels like a very thick wrap with the pattern on both sides, but I'll have to add my own yarn fringe rather than ripping the seams out of the ends to make a shawl like I saw in this tutorial. Sigh. I decided not to return the fabric because even if it wasn't the right type of fabric, the pattern was still the closest to the show's shawl that I've found. And it was also on sale.
I haven't picked out my final belt and shoes, but I borrowed some of hubby's for my "conceptual" mock-up. Ta-da!
 |
| Office chairs make great dress forms. If you're shaped like an office chair. |
Out of the corner of my eye, it looks like the costume! That's what counts, right?
After settling on the pattern and fabric, I studied the pattern and realized I needed an invisible zipper and interfacing, neither of which I fully understood. YouTube has been a life-saver so far! I also needed to research what exactly was so awful about sewing with knits, and why everyone seemed to recoil in horror when I told them my first pattern project was going to use them.
 |
| Pattern cut out |
I had to do a different size for top and bottom because I am pear-shaped. Because this dress is not very fitted, I don't anticipate that this will cause a problem (I hope...). I experimented with adding different lengths to the pattern and went with the longer length. I can always cut it if it's too long, right?
 |
| Pattern pieces played out on fabric |
 |
| Dog helper |
I'm pretty sure I found out what's so awful about knits.
So I have cut out pattern pieces before. No big deal about that. There's a handy little diagram on the instructions that shows how to pick out your size and how to arrange the pieces on cloth. The problem was that the stupid knit fabric kept stretching when I pinned it and then the pins would rip the tissue paper on my pattern. ARGHH!! I also found a stain on my fabric, even though I washed it as instructed before going to sew. Since the stain was directly in the middle of where I needed to cut, I decided to leave it alone until the product is finished and then I can attempt to remove it with bleach. Yay for white fabric!
I've also cut out my interfacing, chosen my thread, and experimented with different stitch lengths and patterns for knits. I don't think I fully understand how to select thread tensions. The only thing I understand is that if I lightly stretch the fabric while it's sewing it does not pucker. This is good. I also found out that you don't have to finish the seams on knit because it doesn't unravel. This is VERY good. However, knit also will not hold a crease when I try to iron it to help me sew in a straight line. Not so good.
That's all I have in me for tonight. Next time I will attempt to mark the cut out pattern pieces with all the random notches and do-hickeys that will hopefully make sense when it comes time to interpret them.
Knits work best with a stretch stitch. Your machine should have one. Also you can get a marking pencil to make a dashed line with a ruler. Get one that washes with water and you can use a dab of water on a washcloth to remove it. I love the dog assistant.
ReplyDeleteEvelyn
I've also been recommended to get a jersey needle for the machine :-/ So looks like sewing will be delayed until this weekend when I get a marking pencil and a different needle! I found the stretch stich options on my machine but they seem to take 3x as long to sew because it keeps going back over itself before moving forward - is that normal? Aaaaaaaahhhhhhhh! I forsee a phone call to you in the near future :)
Delete